
The safest portable generator hookup uses a transfer switch or a listed interlock kit paired with a dedicated inlet box, never a wall outlet or a male-to-male "suicide cord." Set the generator outdoors at least 20 feet from doors, windows, and vents, never backfeed power through a dryer outlet, and call a licensed electrician for any hardwired connection. Those three rules prevent the two things that actually kill people: electrocution from backfed power and carbon monoxide poisoning.
TL;DR:
- Using a transfer switch or interlock kit with an inlet box is essential for the safest portable generator connection, avoiding direct wall outlet plug-ins or "suicide cords."
- A transfer switch isolates your home wiring from utility power, preventing backfeed and allowing automatic or manual transfer of essential circuits during outages.
- Proper sizing and matching of inlet types, circuits, and cord length are critical to prevent voltage drops and wiring mistakes, especially for larger generators and longer cable runs.
- Grounding and neutral bonding must be verified by a licensed electrician to ensure safety and code compliance, with neutral configurations matching generator bonding.
- Regular generator maintenance, including annual testing, oil changes, and checking connections, prevents failures during actual power outages.
Table of Contents
- Portable Generator Hookup Methods: Extension Cords vs. Interlock vs. Transfer Switch
- Why a Transfer Switch Is the Gold Standard for Generator Wiring
- Interlock Kits and Inlet Boxes: A Lower-Cost Hardwired Option
- Extension Cord Hookups: Safe Limits for Temporary Power
- Matching Inlet Types, Amps, and Cord Length Correctly
- Grounding and Bonding: What Your Electrician Actually Checks
- How to Safely Connect and Run a Generator With a Transfer Switch
- When to Hire an Electrician (and What to Ask Before You Do)
- Carbon Monoxide and Fuel Safety Reminders
- What We See Most Often in the Field
- Maintenance Tips to Keep Your Hookup Reliable
- Common Hookup Problems and How to Fix Them
- Storing and Protecting Your Generator and Hookup Hardware
- Why Homeowners Get This Wrong (and What Actually Matters)
- Get Your Generator Hookup Installed Right the First Time
- Sources
- FAQ
Portable Generator Hookup Methods: Extension Cords vs. Interlock vs. Transfer Switch
Three approaches cover almost every situation, and they differ mainly in cost, permanence, and how much of your house they can power.
- Extension cords: temporary, cheapest option, powers only what you plug directly into the generator. No electrician required, but limited to a handful of appliances at a time.
- Interlock kit: a mechanical device installed in your main panel that lets you switch between utility and generator power without both feeding the panel at once. Costs less than a full transfer switch and covers whole circuits, but must be installed by a qualified electrician to remain code-compliant.
- Transfer switch (manual or automatic): the gold standard for a hardwired portable generator hookup. Costs more and takes longer to install, but isolates generator power completely and can run dedicated circuits automatically during an outage.
If you just need to keep a refrigerator and a few lamps running for an afternoon, cords work fine. If you're planning for multi-day outages every hurricane season, a transfer switch earns its price.
Why a Transfer Switch Is the Gold Standard for Generator Wiring
A transfer switch physically isolates your home's wiring from the utility grid before generator power ever reaches your panel, which is exactly why Consumer Reports calls it the safest way to power hardwired circuits during an outage. It eliminates the backfeed hazard entirely, because the two power sources can never be connected to the panel simultaneously.
Manual transfer switches require you to flip breakers by hand when the power goes out. Automatic transfer switches (ATS) sense an outage and start the generator on their own, which matters if you travel often or want backup for medical equipment. The ATS costs more, sometimes two to three times a manual unit, but it removes the human step entirely.
Sizing determines what your electrician recommends:
- Match the inlet amperage to your generator's output. A 30A inlet (NEMA L14-30) suits generators up to about 7,500 watts; a 50A inlet (NEMA 14-50) handles larger units.
- Confirm whether the switch needs to handle the neutral conductor (3-pole) based on your generator's bonding configuration.
- Check your panel's available breaker space and confirm the switch's circuit count matches how many circuits you actually want on backup.
Consumer Reports puts installed transfer switch costs at $500 to $1,500, and most installations take a single day. An inspector will check the inlet's weatherproofing, the switch's UL listing, and that neutral and ground connections follow NEC Article 250.
Pro Tip: Don't oversize the switch just because you can. Pick the six to ten circuits that actually matter (fridge, sump pump, a few lights, the furnace blower) and size around those instead of trying to power the whole house.
Interlock Kits and Inlet Boxes: A Lower-Cost Hardwired Option
An interlock kit is a metal bracket that mounts on your panel and physically blocks the main breaker and the generator breaker from both being switched on at the same time. It's a mechanical safeguard, not a smart switch, so it costs less than a transfer switch while still delivering a code-compliant, backfeed-proof connection when installed correctly.
You'll pair it with an exterior inlet box wired directly to a dedicated breaker inside the panel. A few things matter here:
- The inlet type has to match your generator's output plug exactly, typically NEMA L14-30 or 14-50.
- The box needs a weatherproof, gasketed cover rated for outdoor exposure, since it stays mounted outside year round.
- Conduit and proper strain relief keep the wiring from chafing where it enters the panel or exits the box.
Interlocks generally run less than transfer switches installed, though exact pricing depends on your panel and local labor rates. The most common inspection issues are unlisted interlock kits (not UL-approved for your specific panel brand), missing permits, and inlet boxes mounted without weatherproof seals.
Extension Cord Hookups: Safe Limits for Temporary Power
Extension cords work only when you plug appliances directly into the generator, never into a house outlet, and never through an adapter that lets you backfeed the panel. This is the method most likely to go wrong, so the rules matter.
- Use outdoor-rated, grounded cords sized for the appliance's amperage draw, not just whatever cord is in the garage.
- Avoid daisy-chaining cords of different gauges. A thin cord bottlenecks the whole run and can overheat.
- Keep connections elevated off wet ground and out of standing water, and never route cords through a window or door where they get pinched.
- Position the generator far enough from the house that the cord reaches without stretching or straining the connectors.
Voltage drop becomes a real issue past 100 feet on a standard 12 gauge cord, so shorter runs with a heavier gauge beat long, thin ones.
Matching Inlet Types, Amps, and Cord Length Correctly
Getting the inlet and cord specs right prevents the most common generator inlet box installation mistakes homeowners make. The two connectors you'll see most often are the NEMA L14-30, rated 30A at 120/240V, and the NEMA 14-50, rated 50A. Match the inlet to your generator's actual output plug, not the other way around.
- A 30A L14-30 setup typically pairs with portable generators in the 5,000 to 7,500 watt range.
- A 50A 14-50 setup suits larger units and RV-style connections.
- Keep the locking cord between generator and inlet as short as practical. Longer runs increase voltage drop, and anything beyond the cord manufacturer's rated length risks underpowering sensitive equipment.
- Mount the inlet box with conduit protecting the wire run into the panel, sealed gaskets, and strain relief at both ends of the cord connection.
Buying a cord one size too small to save money is the single most common wiring mistake in DIY setups.
Grounding and Bonding: What Your Electrician Actually Checks
Grounding is where most homeowner-attempted hookups fail inspection. OSHA's grounding guidance explains that a generator's frame can sometimes serve as the equipment grounding path, but connecting to a structure often requires a separate grounding electrode system depending on the setup.
The bigger issue is neutral bonding. Some generators have a bonded neutral (frame and neutral connected internally); others have a floating neutral. The transfer switch has to match that configuration, since a mismatch can create stray currents or cause GFCI breakers to trip for no obvious reason. A 3-pole transfer switch that switches the neutral is required when the generator's neutral is bonded.
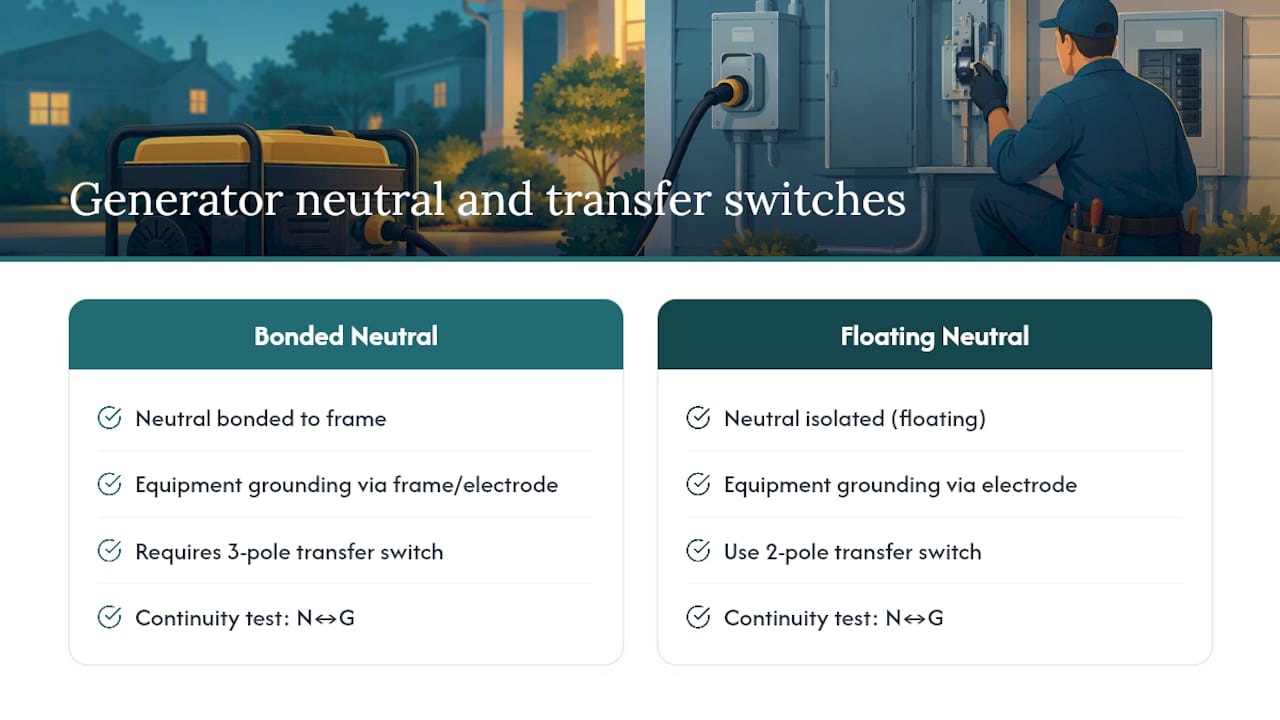
Pro Tip: Ask your electrician to do a continuity check on the neutral and ground after installation, not just a visual inspection. It's the only way to catch a bonding mismatch before it causes nuisance trips during an actual outage.
How to Safely Connect and Run a Generator With a Transfer Switch
Once the transfer switch and inlet are installed, the operating sequence protects both your equipment and your family every time the power goes out.
- Inspect the generator: check oil and fuel levels, confirm cords are undamaged, and place it outdoors on level, dry ground.
- Turn off all circuits on the transfer switch before starting anything.
- Connect the locking cord from the generator to the inlet box.
- Start the generator and let it run for a minute or two to stabilize voltage.
- Verify the generator is producing steady power before connecting any load.
- Switch on circuits one at a time, starting with the largest load (like a well pump or furnace blower), following manufacturer sequencing guidance to avoid tripping the breaker on a motor's starting surge.
- Watch the generator for signs of overload, like bogging down or an overload indicator light, as you add each circuit.
When utility power returns, reverse the order: switch off all circuits, shut down the generator, disconnect the cord, then flip the transfer switch back to utility power before restoring circuits.
When to Hire an Electrician (and What to Ask Before You Do)
Some tasks are not DIY territory, no matter how confident you feel with a multimeter. OSHA is explicit that a portable generator should never connect directly to a building's wiring unless a qualified electrician installs the transfer equipment.
- Transfer switch or interlock installation, neutral and grounding connections, and panel upgrades all belong to a licensed electrician.
- Permit handling and coordination with your local authority having jurisdiction (AHJ) should also go through the pro, since NFPA notes that inspectors enforce specific NEC requirements for existing dwellings.
- Before hiring, ask about their license and insurance, how many transfer switch or interlock installs they've done, whether they pull the permit themselves, and whether they test the system after install.
Schedule this work before storm season starts. Electricians book up fast once a hurricane watch hits the news.
Carbon Monoxide and Fuel Safety Reminders
Never run a generator in a garage, basement, or enclosed porch, even with the door open. State fire marshal guidance recommends keeping it at least 20 feet from doors, windows, and vents. Refuel only after shutting the generator down and letting it cool, store fuel in approved containers away from living space, and install carbon monoxide detectors on every level of your home, especially near sleeping areas.
What We See Most Often in the Field
The mistakes we run into most: wrong inlet amperage for the generator, permits skipped entirely, neutral bonding never checked, and homeowners underestimating the surge a well pump or AC compressor pulls on startup. Some electrical contractors use photo-based consultations to plan circuit selection before arriving on site, then perform a full test run and assist with permit filing once the install is done.
Maintenance Tips to Keep Your Hookup Reliable
A generator that hasn't run in eight months is not a backup plan, it's a guess. Run yours under load for about 30 minutes every month, ideally through the actual transfer switch or interlock setup you'd use during an outage. This does two things: it exercises the engine so fuel doesn't gum up the carburetor, and it confirms your hookup hardware still works before you actually need it.
Change the oil per the manufacturer's schedule, usually every 50 to 100 hours of run time or once a season, whichever comes first. Check the air filter and spark plug at the same interval. Stale gasoline is the number one reason generators refuse to start during an outage, so either run the tank dry between uses or add a fuel stabilizer if you're storing it full.
Inspect the power cord and inlet connection for cracks, corrosion, or loose prongs at least twice a year, once before hurricane season and once after. A pitted or corroded inlet contact can cause voltage drop or arcing even when everything else works fine.
Battery-start generators need their battery checked and charged periodically too. A generator with a dead starter battery is functionally the same as having no generator at all. Keep a log of run hours and maintenance dates taped inside the generator's storage cover. It sounds old-fashioned, but it's the fastest way to know whether you're overdue for service when a storm is three days out.
Common Hookup Problems and How to Fix Them
Generator runs but the house has no power. Check that every circuit on the transfer switch is actually flipped to "generator," and confirm the inlet cord is fully seated at both ends. A half-connected locking cord is one of the most common culprits.
Breakers trip immediately when you add a circuit. You're likely exceeding the generator's rated wattage, especially if the circuit includes a motor. Add circuits in smaller increments and start with a warmed-up engine.
GFCI outlets or breakers trip repeatedly for no clear reason. This usually points to a neutral bonding mismatch between the generator and the transfer switch. Stop using the setup and have an electrician verify the bonding configuration before continuing.
Generator won't start at all. Old fuel, a fouled spark plug, or a dead battery account for most no-start calls. Check fuel freshness first since it's the cheapest fix.
Voltage seems low or lights flicker under load. This often means the generator is undersized for the connected load, or the cord run is too long and too thin, causing voltage drop. Shortening the cord or moving to a heavier gauge frequently resolves it.
If a fix isn't obvious within a few minutes of troubleshooting, stop and call an electrician rather than experimenting further. Guessing on an electrical fault during a live outage carries real risk.
Storing and Protecting Your Generator and Hookup Hardware
Store the generator itself in a dry, ventilated space, a shed or garage works, as long as you never run it there. Cover it with a breathable, weather-resistant cover rather than plastic sheeting, since trapped moisture under plastic promotes rust on the frame and corrosion on electrical contacts.
The exterior inlet box needs a gasketed, weatherproof cover that stays latched shut when not in use. Salt air and humidity near coastal areas accelerate corrosion on unprotected contacts faster than most homeowners expect, so a quick visual check every few months catches problems early.
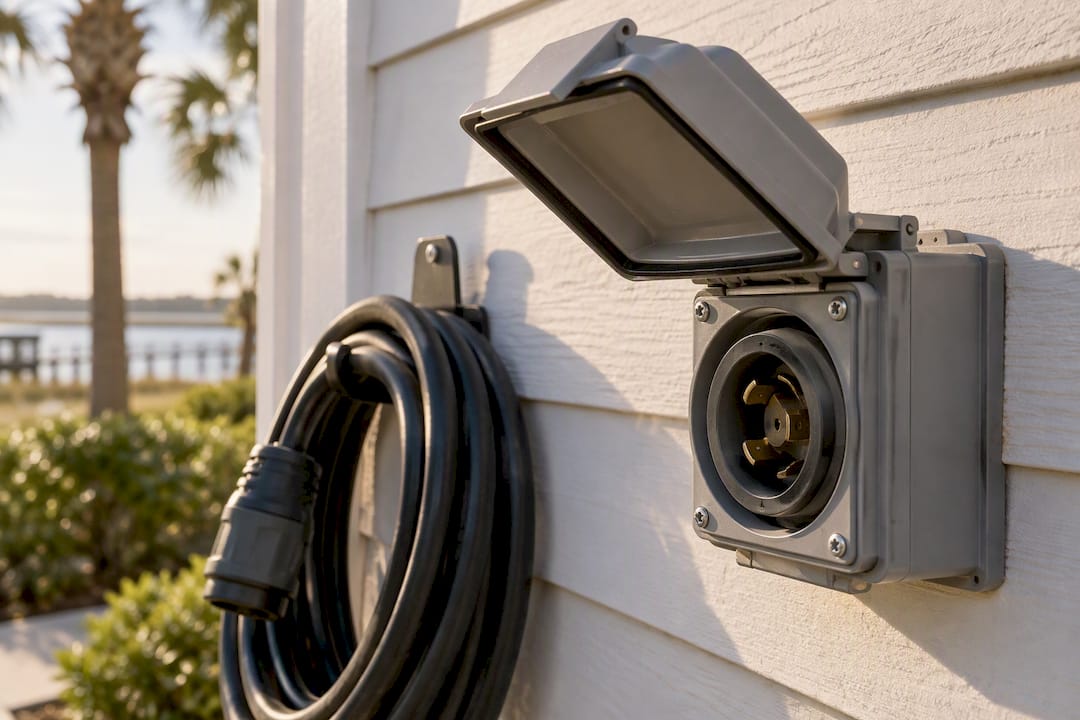
Keep the power cord coiled and stored off the ground, ideally on a wall hook or in a sealed bin, rather than left outside where UV exposure and moisture degrade the insulation over time. A cracked or brittle cord jacket is a shock hazard waiting to happen.
If you live somewhere with hard freezes, drain any water-cooled components per the manufacturer's manual before winter storage. Most portable units are air-cooled and don't need this step, but check your owner's manual to be sure.
Before hurricane season each year, do a full dry run: start the generator, connect it through the transfer switch or interlock, run a real load for 20 to 30 minutes, and inspect every connection point while it's under power. This single habit catches most of the failures that would otherwise surface for the first time during an actual outage.
Why Homeowners Get This Wrong (and What Actually Matters)
The conventional advice on generator hookups spends too much time comparing wattage specs and not enough time on the two decisions that actually determine safety: how the generator connects to your panel, and who verifies the neutral and grounding configuration. Those are the parts homeowners skip, because they're invisible once the drywall goes back up.
Cost comparisons between interlocks and transfer switches miss the real question, which isn't "which is cheaper" but "which one matches how you actually plan to use backup power." A transfer switch that automates six circuits is worth more to a household running medical equipment than the cheapest interlock on the market. An interlock is worth more to someone who just wants to keep a fridge and a few lights alive during a two-day outage.
What we'd tell any homeowner to prioritize first: get the neutral bonding checked before you worry about anything else. A generator that starts every time but has a bonding mismatch is more dangerous than one that's slightly undersized. Sizing problems cause inconvenience. Bonding problems cause shock hazards that don't announce themselves until something goes wrong.
— Logan
Get Your Generator Hookup Installed Right the First Time
Certain professional electrical contractors handle the critical parts of a generator hookup: transfer-switch and interlock installation, inlet wiring, neutral and grounding verification, panel upgrades when needed, and perform a full test run before completing the job.

To get a faster, more accurate quote, have your generator's model number, a few photos of your panel area, and a list of the circuits you want on backup ready when you reach out. This photo-based approach allows planning the inlet location and circuit selection before arriving on site. Head to Guardian's services page to request an estimate, or check out the generator installation page for more detail on what a professional hookup involves in the Myrtle Beach area.
Sources
- Grounding portable generators (OSHA)
- Why a portable generator needs a transfer switch (Consumer Reports)
- How to use a transfer switch for generators (Honda)
- How to use a generator safely (Texas Department of Insurance / State Fire Marshal)
FAQ
Do I Need a Special Hookup for a Generator?
Yes. Powering hardwired circuits safely requires a transfer switch or an interlock kit paired with a dedicated inlet box, not a standard outlet. OSHA requires that a qualified electrician install this equipment to prevent backfeed hazards.
Can I Just Plug My Generator Into a Wall Outlet?
No, this is one of the most dangerous mistakes homeowners make. Backfeeding through a wall outlet can energize utility lines outside your home, putting utility workers and neighbors at risk of electrocution, and it violates code everywhere.
What Should You Not Hook Up to a Generator?
Avoid connecting large loads like central air conditioners or electric ranges unless your generator is specifically sized for them, since motor starting surges can overload smaller units. Never connect a generator to your house wiring without a listed transfer switch or interlock kit.
Is It Legal to Hook Up a Generator to Your House?
It's legal when the installation uses a listed transfer switch or interlock, is installed by a licensed electrician, and passes local permit and inspection requirements. An unpermitted, improvised connection, like backfeeding through a dryer outlet, is both illegal in most jurisdictions and genuinely dangerous.
How Much Does a Generator Transfer Switch Installation Cost?
Consumer Reports estimates $500 to $1,500 for a professionally installed transfer switch, depending on panel complexity and circuit count. For project-specific quotes, it is best to contact the electrical contractor directly after sharing details of your panel and generator.